Hey everyone,
I created a video of the guitar creation from concept to completion. The video is just under 4 minutes. There are a lot of pics and the slides go pretty quick. This is my first YouTube video. I'll post another soon with a live recording so you can hear how it sounds. Please give it a thumbs up in YouTube so it gets more hits :)
Thanks,
Darryl
Thursday, December 8, 2011
Friday, December 2, 2011
Guitar Lessons starting next week
So I've got this bad ass new guitar, but I don't have the skills to make it humm like I want to. So I've decided to take lessons for the first time in my life. I'm not a "bad" guitar player, but I feel like I've peeked on my own and I want to take it to the next level. Hopefully the instructor can help me with my mechanics and solo playing. My aim is to really get into the blues with some jazz background as well. I love the jazz chords, I just don't know very much about the theory. Lessons start next week and will continue weekly until I feel like I've stepped up my game a bit. Watching YouTube videos of people play awesome stuff makes me jealous :) Hopefully I can be one of those people in about 6 months to a year. I want be able to play Hendrix/SRV/KWS songs and not sound like an idiot. Lots of practice and patience. When I can pull off the complete SRV version of Little Wing, I will feel pretty damn good. Right now I can only make it through the first 2 minutes or so.
Sunday, October 30, 2011
Happy Birthday To Me!
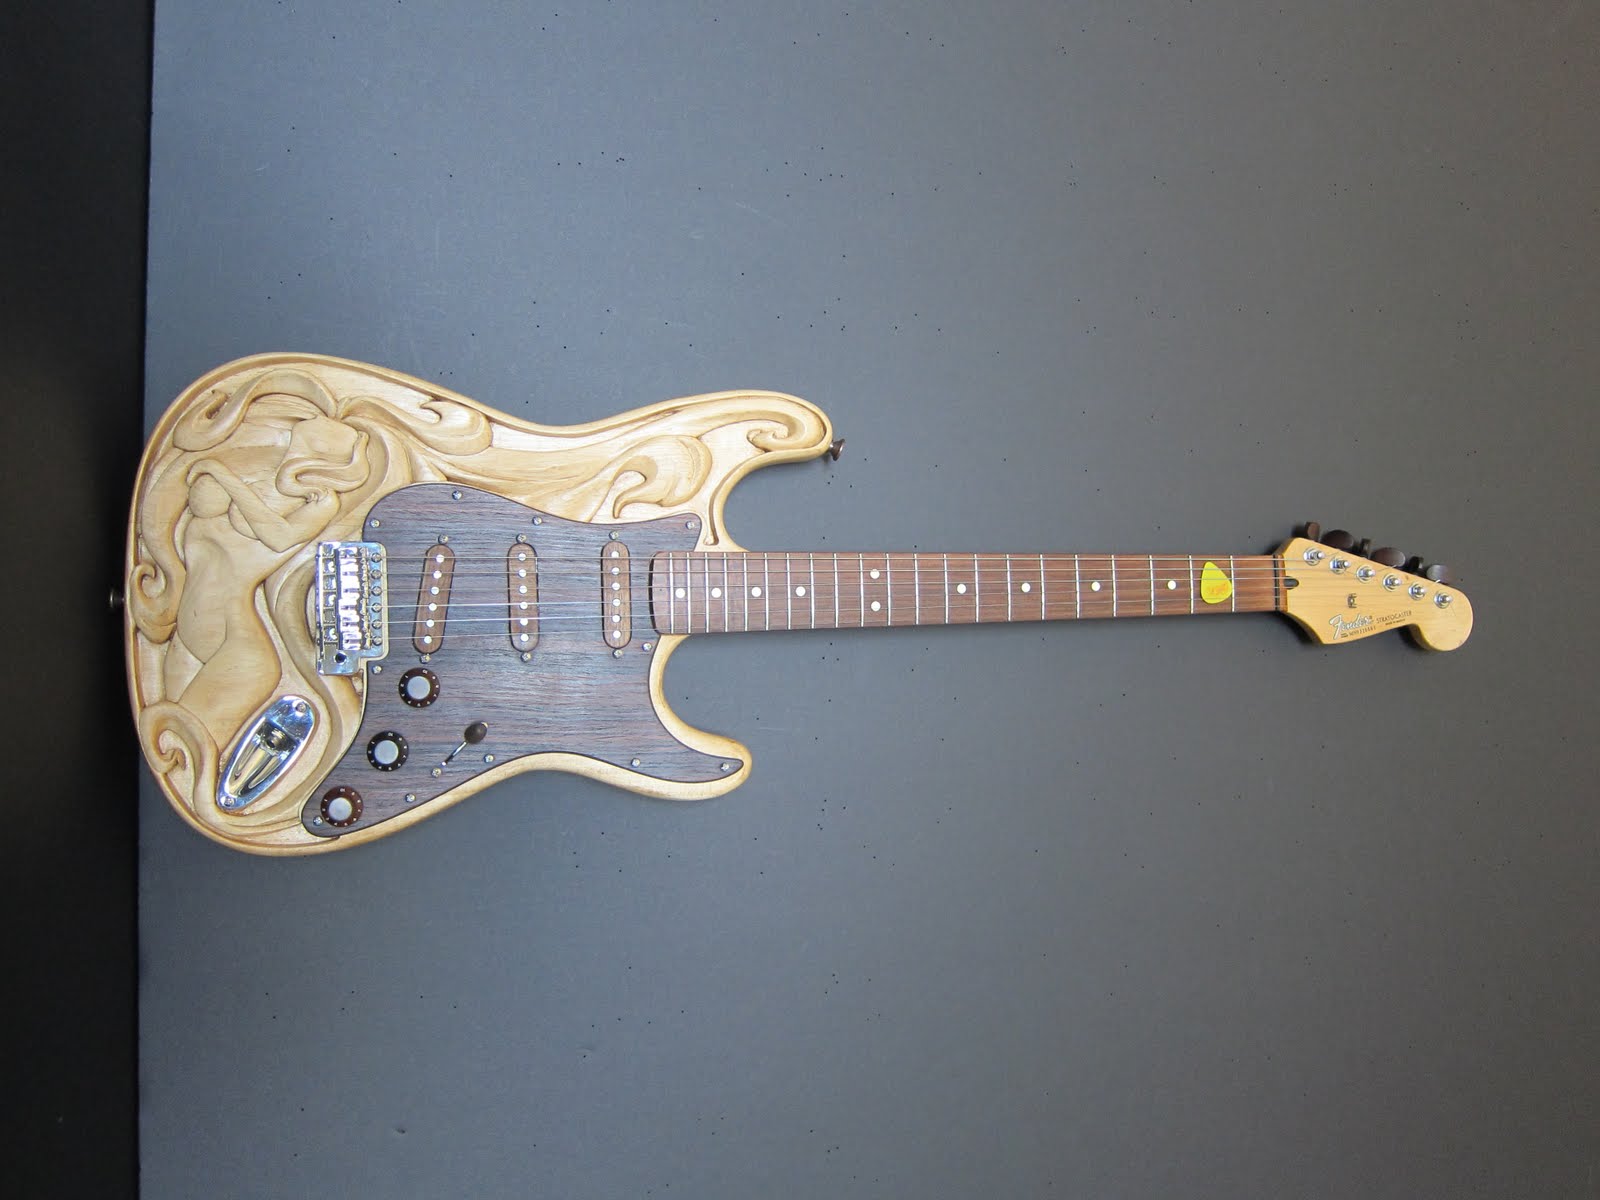
My gift to myself this year is a bad-ass custom carved guitar :) I actually completely finished the guitar about 2 weeks ago and have been playing it pretty much every day since I completed it. I'm just now getting around to posting pictures however. It sounds awesome, even better than my American Strat that I have had for a few years. I think it is because of the Texas Specials I put in it and all the shielding in the pickup cavity. It has a super clean tone with almost zero noise. It plays beautifully and I've set it up with low action on the strings for now. I may tweak that a bit but overall it is very comfortable to play. It weighs a little less than my American Strat, probably because of the type of wood the body is made from. But it has great sustain which is something I was a little worried about. Now for the pics, enjoy!


This project was definitely a labor of love and it was way more effort than I anticipated. But the end result is better than I could have anticipated. It looks great and plays great. I started in early May, and finished mid-October so it took about 5 months from start to finish. But totally worth it. I think I'm going to do another carved guitar in the future, but I'm planning to just enjoy this one for now. It'll be a few months before I even want to start thinking about starting a new project.

 |
| rosewood pickguard & volume/tone knobs, walnut selector know & pickup covers |

 |
| Cocobolo heartwood tuner knobs |
 |
| back of the guitar |

 |
| Rosewood cavity plate & inlay |
 |
| Paisley neck plate |


 |
| Closeup of the controls |
 |
| Walnut pickup covers |
 |
| Whammy bar with carved wooden cap |


 |
| I already had this leather strap on my acoustic, but it looks great on this guitar so I'm going to keep it on this one |
Wednesday, September 21, 2011
Custom parts
I'm nearing the finish line and so now I'm spending some time working on the little details.
Selector Switch Knob:
I created some custom switch knobs out of walnut. I started with a 1" diameter rod, cut it to about .7" and then drilled a pocket in the middle. Next, I used some needle files to smooth out and shape the inside of the hole to match the plastic knob tip that is usually mounted to the selector switch. Then I glued the plastic knob into the wood piece, and shaped the outside contour. Shaping the outside would have been easy with a lathe, but I didn't have one so I did it the hard way. I used gouges to cut the rough shape until it was small enough to put in my drill chuck. Then I spun the piece using the drill, and used needle files & sand paper to smooth it out give it the final shape. Finally, I applied about 3 coats of clear Danish oil finish. The Danish oil on the walnut looks awesome and if I create another carved guitar, I'm seriously going to consider making it out of walnut. I ended up creating two of these because the plastic core I used on the first one didn't fit the selector switch I'll be using. I thought it was standard sizing, but it wasn't. So I made a second one (which came out better anyways):

Whammy Bar:
I got the idea to do this out of shear frustration. When I ordered my hardware, it came with a white cap to put on the whammy bar. This would stick out like a sore thumb, so I ordered a black one instead which would be a little more subtle. When I tried to put it on my whammy bar, I could not for the life of me get it onto the steel rod. Typical cheap Chinese crap hardware. So, I found a scrap dowel rod (I have no idea what kind of wood it is) and made a new wooden cap. Again, a lathe would have been clutch, but I again had to resort to my ghetto methods. I cut the dowel to length, held it with a vice, and drilled out the center. I ended up drilling straight through the entire thing on accident, so I had to plug the end with a little chunk of wood. Next, I put the hollowed out piece into my drill, and turned the speed up as high as it would go. Using sand paper and needle files, I shaped the outside and reamed out the inside until it fit my whammy bar. After sanding and smoothing, the plug on the end blends in with the rest of the piece and you would never know it was a hack-fix. Finally, I slapped 4 coats of clear Danish oil on it. I really like the way it turned out (much better looking and custom than a black plastic tip):
Pickup Covers:
As I mentioned in a previous post, I bought some Fender Custom Shop Texas Special single-coil pickups for the guitar. They come with white pickup covers which would look awful on my guitar so I bought some black plastic covers. But even that would look too off-the-shelf for this custom guitar, so I decided to make some wooden pickup covers. I started off with a 1/16" thick walnut blank, and sanded it down to about 1mm thick. Next, I traced the pickup cover shape & holes onto the blank. Using my Dremel and the 1/16" end-mill bit, I cut out the pieces. This was not as easy as it sounds and took a steady hand. I should mention I screwed two of them up and had to re-make them. After they were cut, I sanded them down and attached them to the black pickup covers using 3M 468MP adhesive tape. I use this stuff at work and once if bonds, it's extremely difficult to come apart so it should be good and rugged. Finally, I cleaned up the edges using needle files to make it flush with the covers. Finally, I hand-rubbed 4 coats of the clear Danish oil onto the cosmetic surface. Here is the result:
Notice that in the middle pickup cover, I swapped the direction of the wood grain to go side-to-side instead of up-and-down. Not sure if that was a good idea, but thought it might look cool.
Pickguard Assembly:
So there you have it. I also attached the electronics to my rosewood pickguard, but it turns out the potentiometers are too large and don't fit in my guitar cavity. I ordered some smaller CTS pots which are better quality anyways, and those should arrive on Monday. Then I will be ready for final assembly. I also just go the rosewood knobs for Volume & Tone, so those will go on next week as well. Here is the pickguard with the hardware installed (no V/T/T knobs yet):
Selector Switch Knob:
I created some custom switch knobs out of walnut. I started with a 1" diameter rod, cut it to about .7" and then drilled a pocket in the middle. Next, I used some needle files to smooth out and shape the inside of the hole to match the plastic knob tip that is usually mounted to the selector switch. Then I glued the plastic knob into the wood piece, and shaped the outside contour. Shaping the outside would have been easy with a lathe, but I didn't have one so I did it the hard way. I used gouges to cut the rough shape until it was small enough to put in my drill chuck. Then I spun the piece using the drill, and used needle files & sand paper to smooth it out give it the final shape. Finally, I applied about 3 coats of clear Danish oil finish. The Danish oil on the walnut looks awesome and if I create another carved guitar, I'm seriously going to consider making it out of walnut. I ended up creating two of these because the plastic core I used on the first one didn't fit the selector switch I'll be using. I thought it was standard sizing, but it wasn't. So I made a second one (which came out better anyways):
 |
| Here is the first knob I created |

 |
| Here is the second knob I created which actually fits my hardware |
 |
| Here is the small plastic piece inside the wooden knob |
I got the idea to do this out of shear frustration. When I ordered my hardware, it came with a white cap to put on the whammy bar. This would stick out like a sore thumb, so I ordered a black one instead which would be a little more subtle. When I tried to put it on my whammy bar, I could not for the life of me get it onto the steel rod. Typical cheap Chinese crap hardware. So, I found a scrap dowel rod (I have no idea what kind of wood it is) and made a new wooden cap. Again, a lathe would have been clutch, but I again had to resort to my ghetto methods. I cut the dowel to length, held it with a vice, and drilled out the center. I ended up drilling straight through the entire thing on accident, so I had to plug the end with a little chunk of wood. Next, I put the hollowed out piece into my drill, and turned the speed up as high as it would go. Using sand paper and needle files, I shaped the outside and reamed out the inside until it fit my whammy bar. After sanding and smoothing, the plug on the end blends in with the rest of the piece and you would never know it was a hack-fix. Finally, I slapped 4 coats of clear Danish oil on it. I really like the way it turned out (much better looking and custom than a black plastic tip):
 |
| Custom whammy bar wooden cap |
As I mentioned in a previous post, I bought some Fender Custom Shop Texas Special single-coil pickups for the guitar. They come with white pickup covers which would look awful on my guitar so I bought some black plastic covers. But even that would look too off-the-shelf for this custom guitar, so I decided to make some wooden pickup covers. I started off with a 1/16" thick walnut blank, and sanded it down to about 1mm thick. Next, I traced the pickup cover shape & holes onto the blank. Using my Dremel and the 1/16" end-mill bit, I cut out the pieces. This was not as easy as it sounds and took a steady hand. I should mention I screwed two of them up and had to re-make them. After they were cut, I sanded them down and attached them to the black pickup covers using 3M 468MP adhesive tape. I use this stuff at work and once if bonds, it's extremely difficult to come apart so it should be good and rugged. Finally, I cleaned up the edges using needle files to make it flush with the covers. Finally, I hand-rubbed 4 coats of the clear Danish oil onto the cosmetic surface. Here is the result:
 |
| 3 single-coil walnut covered pickup covers |
 |
| Wood grain directions alternate |
So there you have it. I also attached the electronics to my rosewood pickguard, but it turns out the potentiometers are too large and don't fit in my guitar cavity. I ordered some smaller CTS pots which are better quality anyways, and those should arrive on Monday. Then I will be ready for final assembly. I also just go the rosewood knobs for Volume & Tone, so those will go on next week as well. Here is the pickguard with the hardware installed (no V/T/T knobs yet):
 |
| Still missing the Volume/Tone/Tone rosewood knobs |
 |
| These pots are too big...I'll have to swap them out |
Sunday, September 18, 2011
Ahrrrrgh!!!
So I haven't posted new pics in a few weeks, but I've made some progress. Well sort of...I also kind of screwed it up a little. You see, I started the finishing process and it hasn't exactly gone as planned. I followed all the instructions/advice about applying the Danish Oil, but unfortunately the process did not yield the results I was hoping for. I ended up applying 3 coats of the Medium Walnut tinted Danish Oil, and 3 coats of the natural/clear Danish Oil. The trouble started with the Medium Walnut application. I sealed up the wood first using the shellac coat, and then applied the oil by brushing it on, letting it sit for about 15 minutes (as I was instructed) and then wiping it off with a rag. And that was the big mistake. By brushing the oil on and letting it sit, it allowed the oil to soak into the wood and it ended up blotching a little bit on the end grains of some areas of the carving. The result is a not-so-great look of dark blotchy areas. But this is a learning experience and so I'm going to take this as just one of those lessons about wood working and not get too bent out of shape about it. Yeah, it sucks, but hey it's my first time doing this so I was bound to make a big mistake. What I should have done instead of brushing on the oil, was just wipe it on with the rag, and wipe it off immediately. It would have given me the brownish-tint I was going for without soaking deep into the wood and blotching. But at least I know for next time. Here are some pics below so you can see the resultant finish. I've mounted the neck and also applied the aluminum shielding in the electronics pockets which will help reduce electrical noise.
I've also been busy working on some other stuff that I don't have pics of yet. I have the East Indian rosewood pickguard and rear cavity plate completed. I applied about 15 coats of the clear Danish oil (using the wipe on method instead of brush on) and it turned out great. I also created some pickup covers out of both walnut and rosewood. I'm not sure which one I'll use yet, but I'll finish both and see which looks better. Once it's all together I'll post pics.


I've also been busy working on some other stuff that I don't have pics of yet. I have the East Indian rosewood pickguard and rear cavity plate completed. I applied about 15 coats of the clear Danish oil (using the wipe on method instead of brush on) and it turned out great. I also created some pickup covers out of both walnut and rosewood. I'm not sure which one I'll use yet, but I'll finish both and see which looks better. Once it's all together I'll post pics.


Wednesday, September 7, 2011
Inlay complete
Last weekend I worked on the inlay. Much thanks to Russell for helping me get this thing made. I think it turned out great. This is a Honduran rosewood inlay. The inlay is 1/8" thick and the pocket in the guitar was 1/16" deep, so after gluing it in place with wood glue, I had to sand down the extra rosewood until it was flush. The seems came out perfect.
I've also ordered the remaining hardware I need to complete this build. I purchased a wooden pickguard made from East Indian Rosewood which will hopefully match my neck fret board. I also found some rosewood knobs that should look pretty good. I was originally going to carve the knobs, but I decided to buy them because I don't have access to a lathe. I also bought some amber speed knobs just to see how they look against the rosewood pickguard. I'm probably going to go with the wooden knobs, but just in case I bought the amber knobs as well. Finally, I bought a set of Fender Custom Shop Texas Special pickups. These should sound great and give this guitar a nice fat Texas blues tone. The only thing I'll need to do is switch out the white pickup covers that come on these with some black covers, and then I plan to veneer the tops of those with rosewood to match the pickguard.
Here are some pics of the rosewood inlay in the back of the guitar:
Alright, so now I'm ready to start applying the final finish to this bad boy. I'll be honest..I've actually started this process, I just haven't taken pics yet. I've applied the shellac layer and two coats of the Watco Medium Walnut Danish Oil. Unfortunately this part isn't going so great. I'll post some updates once I'm made some more progress....stay tuned.
I've also ordered the remaining hardware I need to complete this build. I purchased a wooden pickguard made from East Indian Rosewood which will hopefully match my neck fret board. I also found some rosewood knobs that should look pretty good. I was originally going to carve the knobs, but I decided to buy them because I don't have access to a lathe. I also bought some amber speed knobs just to see how they look against the rosewood pickguard. I'm probably going to go with the wooden knobs, but just in case I bought the amber knobs as well. Finally, I bought a set of Fender Custom Shop Texas Special pickups. These should sound great and give this guitar a nice fat Texas blues tone. The only thing I'll need to do is switch out the white pickup covers that come on these with some black covers, and then I plan to veneer the tops of those with rosewood to match the pickguard.
Here are some pics of the rosewood inlay in the back of the guitar:
 |
| Here is the pocket in the body, and the inlay pieces that will go in it |
 |
| Super high-tech clamping device :) |
 |
| Here it is after getting sanded down flush |
 |
| smoothed to perfection |
 |
| Getting ready to shellac. Again, super high-tech equipment at work. |
Sunday, August 21, 2011
Weekend of torture
Let me just start off by saying that my fingers are completely numb which is good because they are also raw from sandpaper rubbing on them all weekend. I think I spent a total of about 11 hours this weekend sanding down the guitar, but finally I am pretty much done with all the sanding for now. I used 150 grit sandpaper initially, and then went back over everything with the 240 grit, and finally 400 grit. The surface is now really smooth to the touch and should really make the grain pop when I apply the Danish Oil finish. I may hit it with 1000 grit before I apply the oil but I haven't decided yet. It was a grueling weekend, but I'm really happy with the result. I don't think I'll be taking on another project like this for a long time, but I know that every time I pick up the thing and play it, I'm going to really enjoy it.
Next up is finishing up the Rosewood inlay which hopefully I can do this week. Now the good stuff:
I will say, that when looking at the picture above where all the skin was finished and the hair had not been sanded yet, I kind of liked it with the hair unfinished. I like the contrast between the smooth skin and the tool marks in the hair. I ended up sanding down the entire thing, but I'm considering texturing the hair somehow so it stands out separate from the body. Not sure what kind of texture or how I would make it, but I'm just thinking about it.
Next up is finishing up the Rosewood inlay which hopefully I can do this week. Now the good stuff:
 |
| Finished with the 400 grit sanding |
 |
| Started sanding the lower body |
 |
| Finished sanding all the skin..still have hair to do |
 |
| Working on the hair |
 |
| Closeup so you can see how smooth it gets |
Subscribe to:
Posts (Atom)